There’s no better fall activity than apple picking. It’s a quintessential autumn activity. Lucky for me, Kyle and I picked the perfect sunny, cool day to do it in. We went to a lovely little place, Shelburne Farm, in Stow, MA—they had pumpkins, apple cider, floppy-eared bunnies, and kettle korn. What more could you ask for. It was a wonderful morning, and we walked away with an enormous, overflowing bag of gorgeous apples—every shape, size, and kind. Afterwards, we swung by Concord Center, another one of my favorite places, for a little antique fabric shopping…

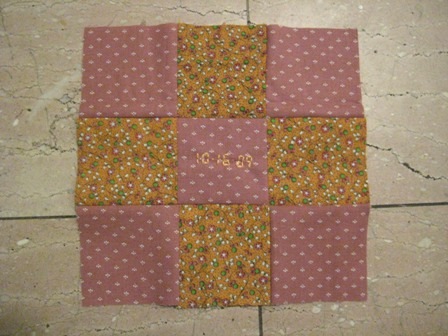
(Turns out, these old fabrics were quite appropriate for this week’s apple-picking-inspired ninepatch)
…and lunch at Walden Grille. The day was going perfectly, until I suddenly realized during the carried home that my slouchy knit beanie was nowhere to be found. Maybe losing a hat isn’t such a big deal to most people (and most hats) but, to be honest, I was heartbroken. In the couple short weeks that I’d had that beanie, I’d really fallen in love. We called the restaurant, the farm, the antique stores, and then drove back and searched around ourselves… nothing. I’ll admit I was more than a little grumpy. But, rather than let this mishap totally ruin the rest of my day, I did something about it. That’s right, in one single afternoon/evening, I re-knit the entire hat. If this sounds crazy, well… it probably is. But I felt a million times better when it was complete.


Probably looks like exactly like it did the first time and that’s because it is exactly the same. But having to re-knit this hat raised a good point. My working process is usually as follows: get an idea, start stitching/sewing/knitting/cooking without any steadfast plan, improvise as I go, achieve a respectably high rate of success, then find myself unsure whether or not I will be able to reproduce my results. Interesting… and sort of a problem when I do want to reproduce them. Luckily, I managed to figure out the hat again, and this time you’d better believe I wrote down what I did. I’ve also decided to share this simple pattern with the masses. It’s very straightforward but with some creative yarn/color choices, you can make yourself a totally unique accessory. I love these slouchy beanies because they keep you warm, but they’re casual and stylish enough to wear indoors as well. So, here you go…
SLOUCHY BEANIE
Note: I’m including instructions for my color scheme in [] but feel free to use whatever color combos you like, alternating every four rows, every other row… or maybe not at all. I used Heirloom Merino Magic yarn from Australia, but most worsted weight yarns will do- just check your gauge. While it doesn’t matter if the body of the hat is loser, you don’t want to the rim to be too baggy (or tight).
Yarn
- Four colors of a lightweight wool or cotton yarn [Green (A), Purple (B), Orange (C), Red (D)]
Gauge
- 5 sts/1 inch on size 10 needles
Needles
- 16″ circular needles, size 6 and size 10
- Double-pointed needles, size 10
Ribbing
- C.O. 100 stitches to the 6-inch needles [with A]
- Knit a 1 x 1 rib in the round (*K1, P1, repeat from *) until you have completed 10 rows, or about 1½”
Body
- Change to the size 10 needles
- [Still using A], *K3, inc, into the next stitch, repeat from * until you have completed one row
- Knit 32 rows of stockinette stitch (knit every stitch in the round), or until the hat measures 6″, not including the ribbing [4 rows B, 4 rows C, 4 rows D, 4 rows B, 4 rows C, 4 rows D, 4 rows B, 4 rows C]
Decrease
- [change to A] *K3, K2tog, repeat from * until you have completed one row
- Switch to double-pointed needles
- *K2, K2tog, repeat from * until you have completed one row
- *K1, K2tog, repeat from * until you have completed one row
- *K2tog, repeat from * until you have completed one row
- Cut the yarn and pull it through the remaining stitches. Weave in all loose ends.
I’ve also engaged in some double knitting that was a little less heartbreaking—as in, not motivated by loss. You see, I’ve fallen in love with funnel scarves (again, I really take back what I said about having enough scarves) and after purchasing this one from Madewell in New York

I decided to create one of my own. So I dug into my stash of Ariosa from that glorious summer that I interned at Classic Elite Yarns, and came up with this:

Another incredibly easy project…and luckily, I kept track of this one as well. But I don’t want to bombard you with too many patterns in one post, so I’ll hold off on it for now…a little motivation to keep coming back 🙂
Pleased with this first funnel scarf attempt, I decided I needed to make another—ideally, one that was multicolored. But I quickly realized that an intarsia funnel neck would only be semi-successful since you’d see through to the carried yarn on the back. Not all that attractive. Here’s where the double knitting comes in. Basically, after scrolling through all the online tutorials I could find, I introduced a new skill to my knitting repertoire: quite literally, double knitting. While the online tutorials are helpful, they’re unnecessarily intimidating, and tend to claim that this is one of the trickiest techniques out there. It’s really not, as long as you keep your wits about you and think about how you’re knitting. The only drawback, as far as I can tell: it really does take twice as long. The bonuses: endless. No unsightly intarsia work on the back, thicker/warmer knitted fabric, and for some reason… it’s just fun. So, here’s what I came up with:

Don’t think that all this glorious knitting means I haven’t been sewing. Au contraire. Then again, this blog post could go on forever, so for now I’ll just share one of my latest little creations, and save the rest for another day.
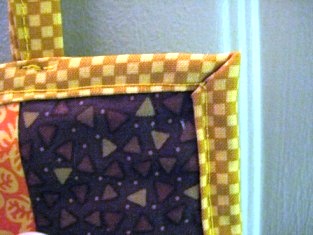
Coming home at the end of a long day is such a good feeling. But I decided it would be nice to have a little something on the door to welcome me back—and to make it clear which apartment is mine for friends who are unable to remember/get lost in the apartment building. There’s no better way to identify my doorway than, you guessed it, a little quilt.

I’m going to guestimate that this took me approximately 1 hour to make…so try it out yourself!
Mini Door Quilt
Materials
- Four 2½” squares cotton fabric, any pattern of your choosing
- One 5½” square fabric for the back
- One 5 ½”square batting
- One strip 2½” x 7″ (can be shorter or longer depending on how you want your hanger to lay on the door)
- One button
Directions
- Sew together two of the 2½” square using a ¼” seam allowance. Repeat with the other two squares. Press the seams open.
- Sew together these two rows of squares, aligning the seams, to form a patchwork square that is two 2½” squares by two 2½” squares. Press the seams open.
- Make a mini quilt sandwich: lay your backing fabric wrong-side up, your batting, and your patchwork square. Center the patchwork square so there is an extra ½” of batting and backing fabric at each side. Pin the three layers together with four safety pins.
- Sew your button through all three layers at the point where the four top squares intersect. To hide the first knot, begin by pulling your needle through the top layer, then back up through the back. Sew through the button several times so that it is secure. To hide the end knot, you can try knotting through the thread between the back of the button and top of the quilt, but this may leave too much bulk. If so, simply a tie a knot at the back of the quilt, and pull the thread through some of the backing and batting before trimming it.
- Trim away any excess batting so that it is the same size as the quilt top. Fold the extra ½” of backing fabric at each side in half and press. Fold it again over the top of the quilt (so it is overlapping ¼”), press, and pin in place, creating mitered corners.

- Edgestitch around the boarder, as close to the edge as possible, through all three layers of the quilt.
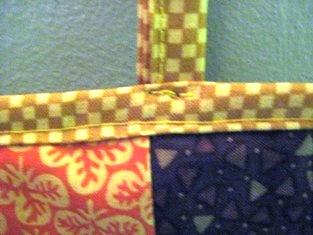
- To make the hanger, fold the two long sides of the fabric strip in toward the wrong side of the fabric so that the edges meet and press. Fold in the short edges of each strip about ½” and press again, then fold the strip in half. Stitch the strip together by stitching very closely to the edge along each short side, and the open long side.
- To attach the hanger to the quilt, simply stitch using coordinating thread. You’ll be able to see the thread on the front of the quilt, but I personally think this is no big deal.

In retrospect, some step-outs might have been helpful for this project. I’ll keep that in mind for next time. Meanwhile, email me with questions!
Of course, there’s also been cooking…with apples…lots and lots of apples. For starters, I used Warren (my yeast) for the first time on Saturday night to make whole wheat sourdough pizza crust. He didn’t rise quite like I had wanted him too (I told you, Warren is moody) but was still quite delicious. Kyle made one pizza (hot sausages, hot mustard, and apples) and I made another (butternut squash, raisins, broccoli, prosciutto, cheese, and of course… apples). So good. There’s really nothing like homemade pizza.

I used this recipe from Pizzathepie.com, but substituted whole wheat bread flour for regular bread flour, and upped the honey to more like 1½ tablespoons. My one caveat: be sure that the pizza is relatively thin before cooking (about ½”) and place it on a greased baking sheet—don’t use foil, it won’t come off easily!
And what other fool could I possibly make besides caramel apple? That’s right, my second time making this as well. So I paid attention.

Caramel Apple Fool
Ingredients
- 8 small apples, cored and diced (I used a combination of all different types: since they’re all stewed together, it doesn’t really matter. Some might get softer more quickly than others, but you won’t notice in the final stages.)
- 1 cup caramel sauce
- ½ cup sugar
- 2 pints of whipping cream (I like good old Hood®)
Directions
- Place the apples and caramel in a large saucepan over medium heat until the caramel begins to bubble just a bit, and the apples, and stir until they begin to soften. Add the sugar and stir.
- Turn the heat to medium-low and allow the apple-caramel-sugar mixture to stew on the stove for about 20-30 minutes, or until the apples are very soft.
- Remove the apple mixture from the heat, and allow it to cool completely.
- Once the apples are cool, whip the two pints of cream using an electric mixer (or by hand, if you’re patient!). This goes very quickly if you place the mixing bowl and whisk in the freezer beforehand. Whip until the cream begins to firm, forming stiff peaks as it whips (or, obviously, so it is the consistency of whipping cream). Keep an eye on it and don’t go for too long: you want it to be soft, not foamy.
- Place the whipped cream in a large serving bowl, and fold in the apple-caramel mixture, ¼ at a time. Mix so that it is evenly distributed throughout the whipped cream.
- Allow to cool in the fridge for at least two hours before serving. It only gets better with time (though goes bad after about a week) and usually tastes even better the next day.
I also figured out a wonderful, quick, weekday dinner: pulled pork and apple polenta. I made it on Tuesday, and loved it so much, I had to make it again on Thursday. Which means, yes, I had to remember what I did. Since polenta is 100 times better when it’s fresh, I’m giving the recipe for one serving, but it can easily be doubled, tripled, or quadrupled, depending on how many you are serving.

Pulled Pork Polenta
Ingredients
- ½ cup yellow polenta
- 1 ½ cups chicken broth
- 1/8 cup grated parmesan cheese
- ¼ yellow onion, diced
- 1 small apple, cored and diced
- ½ cup baby carrots, halved
- ½ cup spinach/any leafy green
- ¼ cup pulled pork*
- 1-2 tablespoons olive oil
- Salt to taste
Directions
- Coat the bottom of a small frying pan with the olive oil, and place it over medium heat. Add the apples and carrots, and cook until they have softened, stirring them continuously. This takes about 20 minutes, depending on how soft you would like them to be. I find it’s nice when the apples still have a little crunch.
- Place the chicken broth in a medium-sized sauce pan over medium heat, and cook until it begins to simmer slightly. Poor in the polenta and stir continuously. Add the parmesan while stirring, and add salt to taste (be generous: polenta needs a lot of help to bring out its flavor). Turn off the heat while the polenta is still very soft, since it continues to firm.
- Meanwhile, turn the heat on again under the apples and carrots, and add the leafy greens and polenta, stirring until all the ingredients are warm—only a couple of minutes.
- Pour the polenta into a soup bowl, and form a slight ditch in the middle. Add the pork and vegetable mixture. Eat it with a spoon, and enjoy!
*I love the store-bought kind those plastic tubs, such as that made by Lloyd’s®. But, if you have 8-10 hours to spare, you can always make your own quite easily. Simply place 1 ½ lbs. of pork shoulder roast, ½ cup water, and 6 oz. barbecue sauce in a slow cooker or crock pot. Cover and cook on medium heat for 8 to 10 hours, stirring every now and then so the pork shreds. When done, stir in the remaining barbecue sauce.
So, I hope you find these patterns and recipes usual, or inspirational at the very least. They mark a new path in my crafting and cooking career, and I’m looking forward to including even more. I’ve always loved sewing, knitting, and good food, and I look forward to spreading the joy.
